Pages

Thursday, January 29, 2009

My cheesey tale of woe

A 'hilarious' thing happened to me a few weeks ago.

I had a severe attack of baking a cheesecake without using an oven, so in order to ease my longings, I doggedly searched for a recipe of baking a cheesecake without in need of an electric oven. After a couple of days zealous investigation, I stumbled upon a recipe from http://www.myresipi.com/ which requires a simple method of steaming the cheesecake.

Thoroughly excited and resolutely single-minded, I urged my husband to buy me the abosolutely essential ingredients needed- the cream cheese and the butter. The other ingredients were already in my cupboard. My husband, being a tactical and practical man, raised his eyebrows in question at the monstrous price of the two ingredients ("Cream cheese RM9.90 for 250g? It's robbery!"). However, I managed to soothe him by saying "Mahal giler ek. Takpe, sekali je, tak jadi tak buat lagi". And he said "Takpela, tak sedap pun abang gak yang makan" :P

And so began the day where I vowed never to steam a cheesecake again. In case you were wondering, the name of the cheesecake was called Brownies Kukus Keju Pak Sahak. After a bit of digging around I found it to be quite popular in Indonesia. As I should have known earlier, this cake was not what I had expected it to be.

Anyhow, after spending about half-an-hour of mixing and whipping the ingredients then pouring the batter into a cake pan to be steamed, it was understandable that I was in a state of excitement + jitters for the result.

And what was the result, you say?

Simple-minded non-working momma that I was, I nearly had a fit when I saw the end result was a very dense cheesey cake. Not at all the spongey-type cheese cake I was imagining about. After a bit of scratching me noggin and wrenching a few strands of hair out, I came to the conclusion that the term 'brownies' was no other than the word 'binka' in Bahasa Melayu. Haha. What that right? I've no idea.

So, in order to conclude this tale of woe, it's a good thing to do your homework before you decide to take a plunge in the unknown territory of cooking. Sekian, terima kasih.


Brownies Kukus Keju Pak Sahak (loyang 8")
Bahan A:
3 biji telur
100g gula
1 sb ovalette

Bahan B:
60g tepung gandum
20g tepung jagung
1 st garam
40g susu tepung

Bahan C:
250g Philadelphia cream cheese (gue guna cheese spread je. OK jak bah)
50g butter

Cara:
  1. Ayak Bahan B.
  2. Pukul bahan A hingga kembang. Masukkan Bahan B dan gaul rata dan sebati.
  3. Pukul Bahan C berasingan, hingga halus dan lembut. Masukkan dalam campuran A&B tadi.
  4. Tuang dalam loyang beralas dan tutup guna foil. Kukus selama 20 minit, api besar.
  5. Sejukkan.

Note: Rasa lagi elok guna api perlahan, tapi make sure air dah sedia membuak. Sebab bila tinggi sangat api kek naik mendadak lepas tu turun pun mendadak. Tapi masa pun lama sket la, 30 min ke.

Update 19 April 2011: When I read this back, I cringed inwardly. Yup, I should be laughed at. I used cheese spread instead of cream cheese (or at least cheese slice for a slice cheesecake recipe) to make a cheese cake. I should be smacked on the head. But can't blame it all on me 'course I really didn't know anything at all about cheese at this time. Maybe next time I'll give this recipe some justice and see how it turns up. *shaking head regretfully*

Aku dan Taufiq demaaaaam

Lama giler tak update blog. Nak kata malas, ya juga. Nak kata takde mende nak tulis, ya juga. Hehe...

Seminggu sudah aku tak sihat gara-gara jaga Taufiq yang demam minggu lepas. Tak tau la, tiba-tiba jak anak aku panas. Kepala panas. Belakang panas. Dada panas. Agaknya sebab cuaca minggu lepas tak menentu. Jap-jap panas. Jap-jap sejuk. Taufiq bab cuaca memang sensitip sket.

Apa lagi, aku dan suami susah payah try menyejukkan badan anak aku tu. Tuam-tuam dia, lap-lap badan dia kasi sejuk. Letak air asam jawa kat dahi dia. Alhamdulillah dua tiga hari pas tu OK dah dia, dah kembali bising balik mulut dia. Sebenarnya masa dia mula tak sihat aku perasan nape budak ni senyap je. Masa dia demam tu serius jak muka dia. Tak senyum-senyum langsung. Menangis macam sakit ada la. Kesian aku tengok dia. Malam-malam tidur pun tak lena. Hingus meleleh, badan tak selesa, tidur pun tak syok dia. Ni sekarang pun tinggal selsema je.

Pas anak aku baik aku pula jatuh demam. Demam kepenatan. Nak bangun pagi pun tak larat. Nak bagi anak aku makan pun aku tak terdaya. Tapi naseb baek laki aku ni prihatin, last2 dia yang suapkan Taufiq. Nangis gak aku dibuatnya, rasa tersangatlah worthless disaat itu. Huhu... Laki aku siap rebuskan bawang putih dengan kentang untuk aku makan nak kuarkan angin. Malam tu rasa macam nak buta je mata, macam migraine teruk sangat. Padahal aku takde migraine. Kepala lak denyut-denyut macam nak pecah je tengkorak ni. Tapi pas muntah, pas dah tidur esoknya baru la lega walaupun badan masih lemah lagi. Cuma sekarang ni dah batuk-batuk dengan selsema jela. Dan takde mood nak makan. Serta takde mood nak masak.

Sekian. Harap maklum.

Monday, January 12, 2009

My doorless-oven cake and two decorated choc moist cakes

Goody! Now that I have my own decorating tools (even if it's homemade), it makes life much easier for me to decorate cakes. Muahahaha...

So what's the latest ideas, tips and tricks I came up with these past few weeks? Muahaha... You might not believe this but I made my own version of doorless-oven cake last night. Huhu... Yeah, you heard right. I used my poor doorless oven to bake a cake. It was truly a bizzare but creative and mind-boggling idea but in a way it worked. Because of the 'uncertain oven temperature conditions', I periodically rotated the pan every 10-15 minutes for 45 minutes, 190 degrees celcius.

Here's what my cake looks like after it had a sunburn under the oven:


Yummy.. Look at the choc icing, folks!

I baked it in a square pan and after hacking off the burnt bits, I alternately layered it with chocolate ganache and chocolate icing. The taste? Oooohhh... It was like a piece of heaven on a plate. Honestly, I think it's one of the best cakes I've ever eaten. It smells truly mouth-watering, it tastes like melt-in-your-mouth chocolate, it's sooo soft, it's unashamedly plate-licking good, and it's...it's.... No words can describe the one-in-a-life-time experience... Hmmm... Maybe next time I'll do another experiment and cover the pan with foil.

Frankly, decorating cakes are messy. My 'workstation' was literally covered with bowls, used tissues, plates, tupperwares, and other odds and ends. Even this was after a bit of cleanup:

Kecahnya...mejaku...


And eventhough the cleanup was a chore, it was worth it. To me, cake decorating is one of the most comforting and truly relaxing experience one can enjoy (though sometimes when one's son is bawling in the background, it can be a bit tiresome, too :P )

Here are two cakes I made using kukus-ing or steamed method last night. One I made for En. Basir's wife, with millions of appologies for returning her plates very, very late :p Huhu... The other one? I dunno. Maybe I'll eat it. Or maybe I'll give Kak Ti a call and ask her if she wants to buy it. Wink. Wink.


A cake with a million appologies

The owner-less cake

Homemade icing coupler ring

Because I'm a desperate housewife, I made my own piping bag with coupler ring last night, with the handy help from my husband. Huhuhu...

You might be wondering what one earth's a piping bag with coupler ring? Well, it is generally used for icing cakes and looks something like below and consists of two parts: the base and the ring.
Piping bag with coupler ring

This is my version looks something like it's just been squashed by a truck:


Homemade piping bag with coupler ring

However, it's dead handy, very economical and relatively easy to make. All you need is an unused drinking bottle with its cap, a sharp pen knife, icing tips and plactic bags.

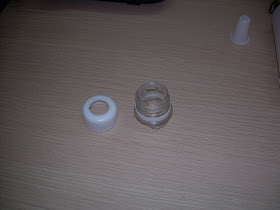
First, you take your old chamber and place it on top of the bottle cap. Then, draw a circle on it. Using pen knife, make a nice round hole through the cap. You'll get something like this:

The ring

Then, cut off the upper part of the bottle, just below the 'ring'. It looks akin to this:

Old piping tube (yang menyusahkan. Haha)

The 'base' from an old bottle- to be put in the piping bag

Put your tip on top of the 'base', screw in the cap or "ring" , and voila! You made yourself an icing coupler ring!

Homemade icing coupler (with the tip enter-frame :P )

The assembled parts

Friday, January 2, 2009

It's a jungle life

As usual, life goes on for a non-working momma while the whole world's snoring away peacefully.

My body's still sore from pulling up weeds, lemon grass, and daun pandan in the mini jungle out back last Thursday. You could say it's kind of a new year resolution, trying to rid of weeds and twines that keep popping up and poking their nasty lil' claw-like, thorny tentacles (they look like tentacles to me) under my kitchen door.

So there I was, spending a perfectly sunny morning stuffing armfuls of dead leaves, dead pandan roots, and all kinds of rubbish in sacks. Had to stop early though 'cause I ran out of sacks, haha. It was a blessing because, eventhough a tiger could've hidden in the mini jungle and you mightn't have known it, there wasn't any pesky mosquitoes laying about in all that rubbish. Good thing, too, or both my husband and I would've been sued for mosquitoe-breeding, haha... After two weeks of mindless house-keeping activities, plus, juggling time for both my son and hubby, it was time for a quiet R&R. Like I wrote before, I managed to 'decorate' two cakes with the 'help' of my lil one. So the result is as you see below:


Mr. Teddy-Bear and the strawberry-iced chocolate cake

See the pinkish icing? It's strawberry-flavoured and as my husband already eaten half the cake and nearly all the teddy-bear, I'd say it was a successful experiment, hehehe... So, till next time. See ya!