Sunday, August 30, 2009

Resepi Almond Londons

How about that!

The ol' non-working momma has been mucking about her kitchen and tinkering with her recipe books and other whatnots for a week now. Huhu.. Maybe she needs a change of scenery and take some time off with her lil' tot and hubby.

Some people have been telling me, again and again, that Hari Raya is still a loong way to go. Yeah, I got that. But don't forget I'll be going a week before Raya so I need to asah my cookie-skills before that. For what? Kuih raya laaa. Asik beli je tiap tahun tapi tak reti-reti nak buat sendiri? So sad....... Sob sob.. Tapi kek boleh lak buat ek? Huhu... Pelik pelik...

Anyway, so far the new things I learned about biscuit-baking are:
*They are unlike making cakes. Cakes, if God-willing, don't turn hard-rock. Unless you have itchy fingers and open the oven door which will give you a flat cake.
*Biscuits and cookies don't like to be over-knead. They get hard when baked because you over-worked your gluten! (Or so I've read)
*They are more aggravating@leceh to do because you have to terap them first. If you're making 200 cookies, then be sure to have a pail of water nearby in case you doze off during the process of menerap, membakar, and menyejukkan biskut pada suhu bilik and also if you're lucky, mendeko.
*They're a lot more fun to eat especially chocolatey ones like Almond Londons because you don't have to slice 'em up first. All you need is a balang-full of cookies and you'll be as happy as Larry!

So last night was my first attempt of making Almond Londons. And I'm happy to say...Kita Berjaya Wonderpets! Huhuhu.. Before making them I had serious doubts. I mean, I never had much experience and probably will ruin all those almonds (mahal tuuu!). But dear hubby had faith in me. So I gritted my teeth and berserah sepenuhnya pada Allah dan alhamdulillah...jadi juga ya. Sooo.. Here they are:

A tray-full of yummy Almond Londons

Choc rice and gula manik for deco
Chopped almonds for deco
A balang-full of Almond Londons (50 pieces inside)
A sneak peek inside

Wanna sample? Sure, as long as I don't gobble 'em up first la :P Seriously, if you want a taste, contact me (if you live nearby la). And sementara stock masih ada la. Tengok gaya ada tangan yang asik mencelup dalam balang je :P

For 50 pieces, I'll give you RM19 sebalang. Nak masukkan lebih tak muat so for 100 pieces (2 balang)s for the price of Rm35. Huhu.. Yeke orang berminat nak beli ni? Macam ye jek ek.. Haha.. Kalau leh tempah awal sikit sebab 13 Sept nak terbanggg sudah. Hehe... (Yeke orang nak beli ni? Haha..)

Anyway, for those who are interested, here's the recipe, got from nizamadey@myresepi.com.
Thanks Nizam!

Almond London (nizamadey@myresepi.com)
Bahan-bahan (-+150 biji)
250g mentega
125g gula halus
1 biji telur
1 sk esen vanila
50g serbuk badam (optional)
200g tepung jagung
300g tepung gandum
2 sb tepung beras
1 sk baking powder
200g kacang badam (digoreng tanpa minyak) (I just put in the oven for 5min, 160 degrees celcius)
50g badam cincang (hiasan)
-+ 700g coklat masakan + 1/2 sb shortening
Cara-cara:
  1. Pukul mentega dengan gula hingga kembang.
  2. Masukkan telur, esen vanila, dan pukul lagi.
  3. Masukkan serbuk badam, kacau.
  4. Ayak bersama tepung jagung, tepung beras, baking powder dan gaulkab bersama adunan tadi.
  5. Masukkan tepung gandum sedikit demi sedikit, hingga jadi doh (doh agak rapuh).
  6. Bentukkan doh menjadi bulat-bulat kecil/lonjong dan masukkan badam di dalamnya.
  7. Letakkan di atas dulang pembakar yang dilengserkan sedikit mentega.
  8. Bakar pada suhu 200C, 20 min (I cook about 10-15 sebab taknak terlampau perang sangat guna oven tangkring).
  9. Cairkan coklat masakan secara double boil (bekas tahan panas di atas periuk berisi air mendidih).
  10. Masukkan biskut (pastikan dah betul-betul sejuk) ke dalam mangkuk kertas atau celup ke dalam coklat cair (ku sudukan guna sudu coleslaw KFC je sonang). Taburkan badam cincang diatas.
  11. Biarkan kering seketika dan sedia dimakan/disimpan.

A BZ Week- And A VERY Special Break Fast

How time flies when you're bz!

Yup, it has been a very busy week for us, especially your's truly. Hubby's friend, Wilson, wanted to order a cheesecake a few days back, so I made a sample for him to taste, to see if it's to his liking.

You know cheesecakes. They never taste the same, as there are plenty of different kinds of recipes to choose from. Some are dense, others are airy and light, and a few are velvety and smooth. Anyway, I made a Cotton Soft Japanese Cheesecake as a sample, which to both my husband and I, tastes just like eating pure, creamy cheese. Personally, we like non-baked blueberry cheesecake the best as the presence of yoghurt adds a delicious tang to the cheesecake. I don't have the recipe at the moment but one day I'll make another and upload the recipe with its picture. Oh yeah, anyone who's interested can order a cotton soft japanese cheesecake, about 400g for RM15 or so, anytime, anyday. Cheesecakes are supposedly to be expensive but I'll give a discount (eventhough cream cheese here are frightfully expensive than Semenanjung :p).


Chock-full of cream cheese
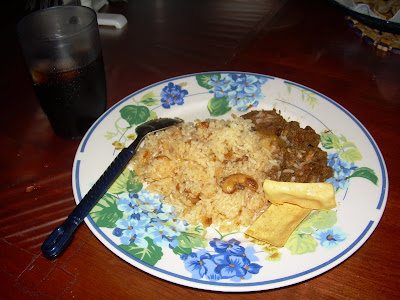
Back to the story. After a hard week's worth of work (doing what? Experimenting of course!), I just didn't have the time (and energy) to fix a difficult meal. So my hubby gallantly offered to cook today, making a delicious Nasi Beriani ala Gam style and Daging Beriani to break our fast. And truthfully, he made it better than I ever will! The recipe? Maybe later, there's a lot of ingredients involved and I just don't have the energy to type a looong story :p


Nasi Beriani ala Gam style- just put the Daging Beriani in a pot and top it with the cooked Nasi Beriani, then leave it to cook again slowly (though he did it his way and did it the other way round :p)

A simple dish- but full of flavour

The cook's been on strike for a week (lesu sebenarnya :p) and didn't have any ideas to for break-fasting meals but she'll be back tomorrow (hopefully) with a new recipe that's never been tried and tested. See ya!

Thursday, August 27, 2009

Resepi Biskut Raya Mama Carries

Hmm..

I've tried making cakes, cupcakes, and bread. But never biscuits. Well, very rarely and they didn't turn out as I expected (they went on strike and either got flat when baked or blown up like baloons, huhu). Did try making biscuits a loooong time before I was married to my dear hubby. And each time they turn out different, eventhough they were from the same recipe! :P

But now alhamdulillah, I managed to bake a batch of Mama Carries last night and they turned out quite satisfactory. The icing puffed up nicely and didn't dribble down the sides (like I made last year). It turned out you got to make them as delicately as making meringues- whip 'em up nice and fluffy and get no oils in them. And it's easier using the back of a spoon to deco them (some might find using a finger is much easier).

After three bakes into the oven (I got three trays full), I managed to get about 100 pieces all together. And even that I halved the recipe!

Hey, I ain't no Picasso but I can make a squiggle :p

I'll be making these again, insyaAllah, should anyone wants to make an order. A big balang-full about 100 pieces for RM18. Cewaah. Macam la ada nak beli ek :P

In case you want to try it yourself, below is the recipe from lilydvalley@myresipi.com. Thanks Lily!


Biskut Mama Carries lilydvalley@myresipi.com

Bahan-bahan ( 60-75 biji )

300gm mentega/marjerin
375gm tepung gandum
130gm tepung jagung
100gm gula icing
1/2 sudu teh esen vanila

Utk hiasan
-1 biji putih telur
-100gm gula icing
-1 sudu besar tepung jagung

Cara-cara

  1. Ayak tepung gandum & tepung jagung-ketepikan.
  2. Pukul mentega/marjerin dan gula icing hingga kembang.
  3. Masukkan esen vanila.
  4. Masukkan tepung sedikit demi sedikit dan uli hingga menjadi doh lembut.
  5. Canai doh dan terap dengan acuan berbentuk "heart".
  6. Sapukan hiasan keatas biskut yg telah diterap. Utk melorek, gunakan penyunkil gigi.
  7. Bakar pada suhu 150C selama 20-30 min, atau sehingga masak. Gunakan api bawah supaya hiasan tidak berwarna perang.

HIASAN:

  1. Pukul putih telut hingga gebu. Masukkan gula & tepung, kacau sebati.
  2. Ambil 1 sudu besar adunan dan titikkan dgn pewarna atau emulco kegemaran anda.
  3. Sapukan putih telur keatas biskut
  4. Lorek kan dgn adunan yg telah dicampur dgn pewarna/emulco.

UPDATE 7/4/2011: Maybe one day I'll make this again and post another recent picture. The icing on this one seems rather dry, haha..